Nature Painting with Sara Tall

Hi everyone! What a beautiful day! The sun is out. The birds are chirping and I am in the mood to PAINT! But I’m going to use something other than a regular paint brush. I’m going to try painting with natural objects around my yard and woods! And I am going to paint outside too!
Here are my supplies:
Paper
Paints
Palette Brushes (for coating plants)
Plants
Blanket

Our yard is full of beautiful, fluffy dandelions. I just love them. The yellow is so bright and cheery. I just dipped the flower into the paint and tapped it on the paper.


I used all the colors on my palette and tapped over the whole piece of paper. When I stopped and looked closely it looked like something had danced very fast across the page!


Next I used a bit of Hemlock from our woods. I used my regular paint brush to brush a good amount of paint on the Hemlock needles and the little cones. Then I pressed and dragged the tiny branch around the paper.

The design looks scratchy and rough. I love how the cones made blobs of color and the needles stretched the paint across the paper!


My last natural paint brush is a delicate purple myrtle flower. I twisted the flower through all the colors of paint (more than once as you can see!) and then pressed the petals flat faced to the paper.


I had so much fun with this project
and I hope you will too! What natural objects can you find to use as a paint brush? I’m excited to find out! Enjoy this beautiful day! XO Sara Tall XO
Nature Color Mixing
Have you ever wondered about how the many colors of our world are created? Join LCC in creating with the color palette of nature using just 4 primary colors.
Two of my most favorite things in the world are being outside and lots of color. When I go out for a walk I love to spend time just looking around. On sunny days I notice the bright, bold colors in the sky and in gardens. On grey, rainy days I notice the dark clouds and muddy ground. Have you ever wondered about how the many colors in our world are created? Let’s check it out!
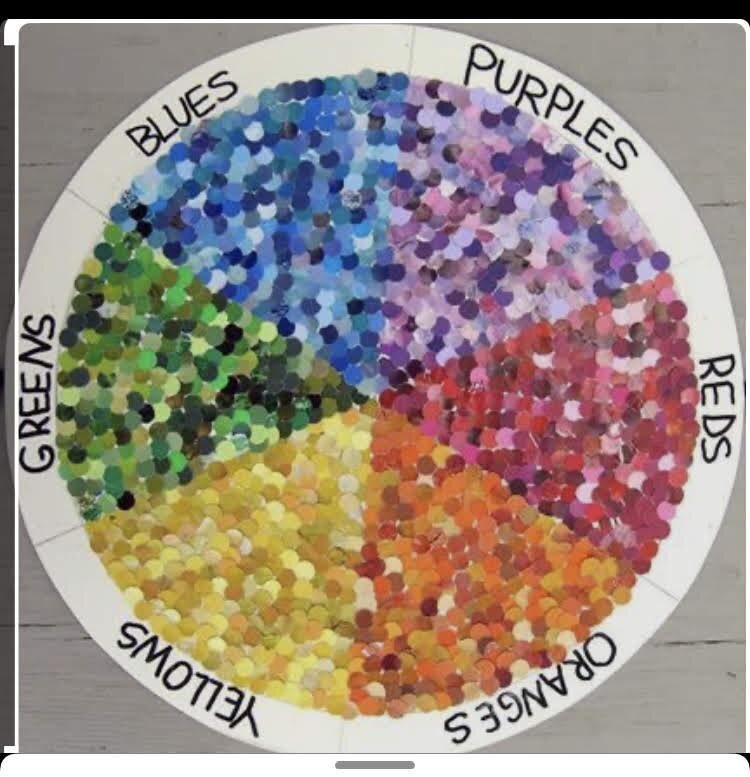
A really good place to start is the color wheel.
The color wheel is very helpful to artists. It shows them which colors to start with and how to make the colors harmonious. Harmonious means things get along. When colors mix happily together they make our eyes and minds happy!

Red, yellow and blue are known as primary colors.
From these three colors you can make almost ANY color you can think of! I’m serious! They are amazing! Adding white to the palate can help make a color lighter. Ready to start mixing? YAY! I am too.
My first color combination is red and yellow. Combining these two colors gives me a crazy bright orange. I added a little bit of white and matched my nature inspiration, a beautiful monarch butterfly! (It is really sitting on my hand!) Can you think of something orange?


My next color combination to mix is blue and yellow. Can you guess what color these two make? GREEN! My nature inspiration here is a nest full of Robin eggs. I mixed the blue and yellow with the white and got a nice soft turquoise. (This nest was in a cedar tree at my house!) What is your favorite shade of green?


And here is my last color mixing combination. Red and blue together make a deep, rich purple. When I mixed in a bit of white I was able to match my nature inspiration. I took this picture on trip to Minnesota with my family. It’s one of the most beautiful flowers I’ve ever seen. Can you think of something purple you like?


Happy mixing and be sure to share your colors and inspirations. Have beautiful day! XOXO Sara Tall XOXO

Paper Bag Puppets with Rachael
Watch my video as you make your own paper bag puppet! Make more than one puppet, and have a puppet show behind a box or piece of furniture? You and your child can explore broader/more abstract ideas, topics, and even current issues that might be celebratory or troubling as the puppet does the talking. Therefore, puppet making is not only a creative art outlet for your child to express their individuality, but a way to explore social emotional expression - and to help address anxieties, fears, worries, or feelings of excitement and anticipation. Go with the flow! Make clothes, add details with glue (beads, the foam shapes thy cake inside your bags, etc.) and let your imaginations run wild! You might even want to record your child’s original stories to read later or act out familiar stories your children cherish:) If your child is inspired to create, share a photo of their puppet, and maybe a chosen name!
Crushed Chalk Paint
Here is another beautiful, fun process art project! The bright colors of sidewalk chalk make a wonderful invitation to create while the chalk crushing benefits hand-eye coordination and develops grip strength. It’s magic all the way around!

Crushed Chalk Paint
Here is another beautiful, fun process art project! The bright colors of sidewalk chalk make a wonderful invitation to create while the chalk crushing benefits hand-eye coordination and develops grip strength. It’s magic all the way around!
Here’s what you’ll need:
Pieces of chalk (I like sidewalk chalk. It’s very colorful and a bit softer)
Water
A mortar and pestle
Small jars
Small bowls
Spoons
Chopsticks (for stirring. Totally optional)
Paintbrushes
Paper Tray (optional, used for painting on)


Step 1
The first step is crushing up the chalk. Put a piece in your mortar and crunch and crunch and crunch with your pestle until your big piece of chalk has become a soft, fine powder. There maybe big chunks but that’s okay! You can leave them in the mix for more textured paint or take them out and crush up another time. Put each color you crush into small bowls.

Step 2
Once your chalk is crushed up you can begin to mix up your colors. Take a small jar and scoop some chalk powder in. Add a little water and stir. Add more colors until you love the color so much you don’t want to add anymore! Keep filling your jars and mixing. You will have many paint colors to work with.

Wow!
Look at all the colors we mixed up. They are so beautiful.

And now! The moment of magic.
Grab a piece of paper and a paint brush and make… PAINT! You might notice the texture of your paint. Is it smooth or is it a little lumpy? Which do you prefer?

Let’s name the colors!
One thing I love to do while working with my new paints is to name the colors! Can you name yours? I had a mint green, a tangerine orange and my most favorite color was a turquoise that reminded me of Lake Michigan in the spring.
ENJOY! ENJOY! ENJOY!
Snap Painting
Fine motor skills are essential building blocks to being able to manipulate pencil on paper. A strong pincer grasp is key to this process. This beautiful art project is a fantastic and easy way to work on the pincer grasp. Have fun! I can’t wait to see what you create!

What you’ll need
• A shallow box (I found mine in the recycling)
• Rubber bands
• Paper
• Acrylic paints
• Paint brush
Put your rubber bands around the box. You can put as many as you like and space them however you wish. Now slide your paper into the box making sure it lies on the bottom. Trim to fit if you need too.


Time for color! Ready your palette and begin to paint the rubber bands. Get A LOT of paint on the underside of the rubber bands. Some will end up on the top and that’s just fine.


Now comes the fine motor work! Grasp one (or more!) rubber band and pull it straight up. It will feel tight. When you feel ready let go of the rubber band. BOOM! Beautiful splatters of color.! Keep adding paint and pinching the rubber bands and splattering that paint. You can even change the rubber bands to the other side of the box. This really fills up the whole paper.


Here is my finished piece.
I love it
You can change the thickness of the rubber bands or you could even try this with yarn or string. Keep working on that grasp. See you for another project soon!

Potion Making
What child doesn't love magical processes? Many of LCC art experiences lead to experimenting and creating some sort of concoction. Young children often tend to resemble mad scientists rather than fine artists and have an innate desire to mix and concoct. There is no right way when it comes to potion making (or for most things at LCC for that matter) and we feel that it is important to not "manage" or "direct" these experiences and make space for allowing things to get messy. Here are directions to get started, but you can add anything to your "potions" that kids might think of (with in reason of course:)
What you’ll need:
Baking soda (lots and lots!)
Colored water (I used tap water and liquid water color but food coloring works just fine too.)
Eye droppers or pipettes
Small clear glass jars or bowls
Small bowls for baking soda Spoons for scooping baking soda
Chopsticks (for stirring potions but spoons are a good choice too.)
Scoop baking soda into your jar. Start dropping colors in the jar with your baking soda. There’s no right or wrong way. The sky's the limit here!


Give your potion a good stir with your chopstick or spoon. What color did you make? What would you name your color? When you’re ready for a new color rinse your jar out and start the process all over again.


Salt Painting (a little science and a little art)
Here’s what you’ll need:

Water color paints
White glue (bottle)
Salt
Paper (heavier is best)
Paint brush
Water
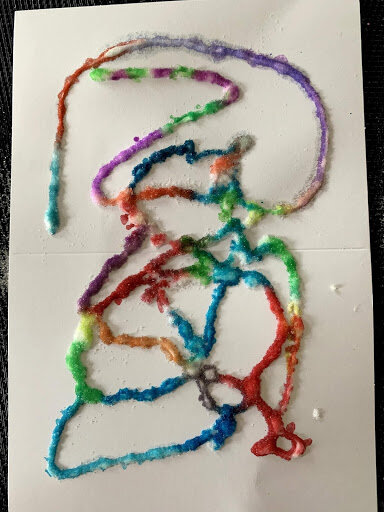
Squeeze your glue in squiggles and swirls( or whatever shape you like) all around your paper


Shake the salt all over the glue covering it completely. Shake off extra salt.

Get your paint brush and paints super dooper wet.
Let the tip of the paint brush drip watercolors onto the salty glue. The colors travel through the salt!


And voila! Beautiful art.


Marvelous Masks!


~paper plate
~hole punch
~double sided tape
~glitter
~twisty ties
~fabric scraps
~ribbon
~paint and brushes
~a stick
(this list can be added to and altered to your heart’s desire!)
Cut out a nose section and eye holes. Also, punch your holes up along the top too. It’s much less messy to punch holes before you start your painting.


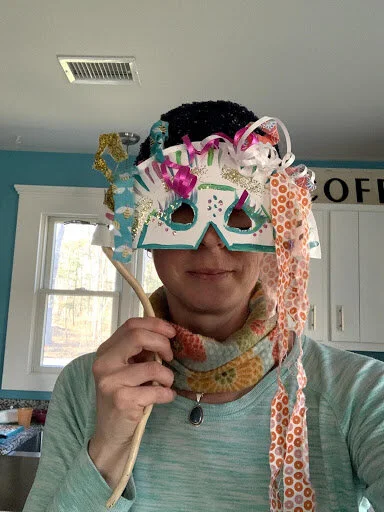
Time to add the fancy! I like to use paint and different size brushes. Double sided tape is super for adding glitter. Put a little piece on the mask and shake the glitter on top. Voila! Sparkles exactly where you want them. Weave fabric and ribbons through and around the holes punched in the top. Attach the stick to one side with twisty ties (but don’t be afraid to try another idea to attach. I just really wanted to use my twisty ties!)


TADA! Here is my finished mask. I love it . I think my favorite part is choosing my materials. What is your favorite part? Have a super day and here’s to creating!
Painting with Cars, Trucks, Tractors, Diggers
Materials Needed:
Paper
Paint
Toys with Wheels!
Instructions:
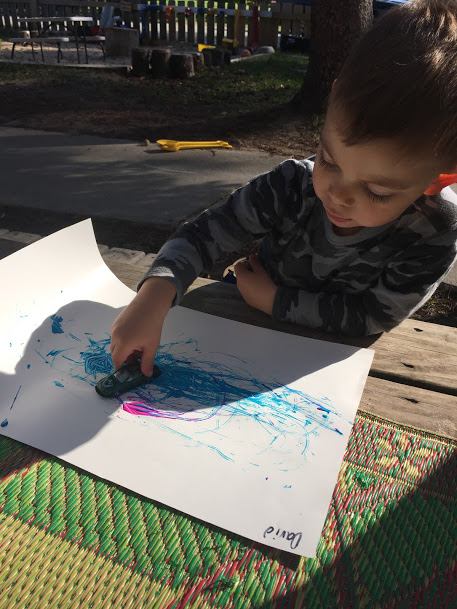
Ask your child to gather some of their favorite wheeled vehicles to use for this fun art project.
Place a sheet of paper (the larger the better) on a flat surface and have your child choose which color of paint they would like to use.
Now the fun part, drive the vehicles through the paint and see what kind of different tracks the wheels make!
Afterwards you can fill up the sink with warm soapy water and let your child clean the vehicles!


Marble Painting
“Marble painting is a fun activity that kids get physically engaged in and I love that it can be done on a small, big, or gigantic scale and works just as well for individual and collaboration art pieces too!” - Sara Johnson
Materials: Marbles, different assortment of colored paints, paper and tray (a 13x9 baking dish works perfect too if you don’t have a tray
Directions: Start by squirting different colored paint on to your piece of paper. It’s lovely to let the children choose what colors they want and to have a go at squirting the paint themselves. They might want all the colors of the rainbow or just one or two. However many they choose they’ll enjoy seeing the patterns form.


